Showing posts with label guest post. Show all posts

0 guest posting {interiors addict}


The lovely Jen from Interiors Addict is off on her honeymoon and I am filling in today on her blog talking about what I do best - Op shopping! Pop on over to read my top ten tips and my favourite ever finds
Facebook Twitter

3 DIY {peep guest lyndsay}


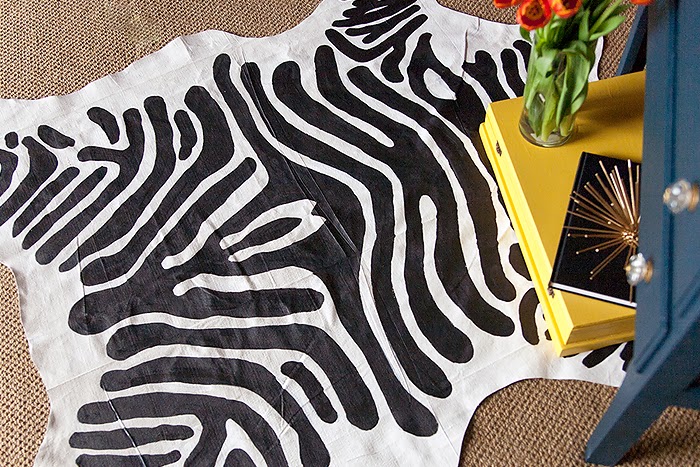
I was cruising around Instagram when I saw Lyndsay's latest DIY and I immediately emailed her asking if she would do a tutorial, I thought it was so clever! Lyndsay is a self confessed 'Treasure hunter, maker of things and designer for Frankie Jean' and here is her DIY zebra hide...

I love the look of zebra hide - something about those graphic black and white stripes always makes my heart beat a little faster. I was always prohibited by the price of buying a zebra rug (and how a real one was attained, which made me uneasy), and inspired to see brilliant DIY results on blogs like Brittany Makes and The Hunted Interior... I figured I had nothing to lose filling in a few hours one day experimenting with making my own fake one. These are the simple steps I took to making not one but two zebra rugs of my very own, using a painter’s drop cloth and paint. 

You will need:


1. Roller and tray 
2. A medium tin of white paint for your base coat – we used Pascol Ceiling Paint in white. 
3. A small pot of your accent colour – we used a Dulux sample pot in “Klavier” (not pictured) and two pots of White Knight Strokes enamel in Gold – this was enough paint for two rugs. 
4. Canvas painter’s drop cloth - choose a size that is close to the finished rug you want. 
5. A print out of a zebra hide for reference 
6. Pencil and eraser 
7. Paintbrush 
8. Scissors 
A tarp, plastic or paper sheets to protect the surface you are working on (not pictured). 

Step 1. Prepare your drop cloth. 


Zebra hides traditionally have a white base with black stripes. The first step to your DIY rug is to cover your drop cloth with a coat of white paint. 

Stretch your drop cloth out over your protective sheet or paper (leaving it flat overnight if you have time to help the creases to fall out). You may also like to tape the corners down with masking tape to keep it flat whilst you paint, but if you roll slowly and steadily you can skip this step. 

Roll your white paint all over the drop cloth until it is completely covered. I recommend using a thick white paint for easy coverage– ceiling paint is great because it has a thick consistency and you should only need one decent coat. You can use a paintbrush to paint on your white paint, but a roller and tray will make this step a lot quicker/easier. 

Leave to dry – I hung mine on the clothesline on a sunny day and it was dry within a few hours. 

Step 2. Trim your drop cloth. 


The next step is to make your rectangular drop cloth into the shape of a traditional hide. The best way to do this is to fold your drop cloth in half and draw half the outline of your hide onto the exposed drop cloth, using your reference picture as a guide (you can use this first half to trace the same shape on the other half of your hide, which would make your finished rug symmetrical). I recommend drawing your hide outline on the non-painted side of your drop cloth. 

Once you are happy with your sketched shape, trim with sharp scissors and lay flat to inspect.


Don’t worry if it’s not quite the shape you want, you can always trim more to get the shape you want – however it’s a lot easier to trim more off than to put it back on, so take your time with this step! Also don’t worry if it isn’t perfectly symmetrical – most traditional hides aren’t. 

Step 3. Sketch your stripes. 

Now that your drop cloth is slowly turning into a rug, it’s time to add stripes.


Using your reference picture as a guide again, start sketching out where your stripes will go with a pencil on the painted side of your drop cloth. I found it easiest to fold my rug into segments and gently crease (in half, and half again), and did the same with my reference picture - and worked on one segment at a time to make sure my scaling was right. It is also easier to work from the centre outwards – the centre of my reference picture had a distinctive “W” shape which was a good place to start. 

If you get confused as to whether the shape you are outlining will be white or black, you can gently shade in your black stripes from the inside out to make sure you don’t get mixed up! 

Once you have finished, step back and check to see that you are happy with how it’s looking. A good rule of thumb is that zebra stripes start out quite thick, spaced out and long in the centre, and become thinner/tighter/shorter as they get closer to the edges. 

Step 4. Paint your stripes.

It’s time to fill in your sketched lines with paint, which is the exciting step because your rug will start to look like a proper zebra hide! 


Once again, it is a good idea to start from the centre and work outwards – you will keep your white and black stripes straight, and you will lessen the chance of smudging. 

Leaving your paint exposed to air for a little while before you start painting will thicken the paint up and make it easier to apply to your canvas. 


Don’t stress too much if you go over the sketched lines with your paint – if there are any major mistakes, you can wait until the accent colour dries, and then paint over it again in white to neaten things up. 

You may also like to paint a border around the outer edge of your rug a la Jonathan Adler’s. 

Wait for your accent colour to dry and then check it over to see if any areas need touching up – this is where a little extra paint in the bottom of your pot comes in handy. You can also paint over any exposed pencil lines. Give your rug a day or so to fully dry/cure.

Step 5. Admire your new rug!

You can use traditional black and white paint, or mix it up and use another colour instead. We used both metallic gold and a more traditional dark grey but you could use any colour you like. 


If you are planning to use your rug in a high traffic area, you may like to seal it with clear polyurethane, but test this on a small patch first to make sure it doesn’t affect your colour. You can iron your rug, but leaving it lying flat for a day or so will help the majority of your creases fall out naturally (and life is too short to iron rugs, lets be honest). 

Enjoy! 
Facebook Twitter

0 guest post {little bits of lovely}

sneak peek of my post

i am guest posting today over at Little Bits of Lovely for the lovely Rachel while she is off swanning around Europe! if you don't already know LBOL you really need to - full of words of wisdom to make your day more lovely and lots of snippets of her home and outfits. Rachel has a clear style language - classic and chic - which she has down pat! plus she has a highly lauded pinterest that you have to check out, hopscotchgrace. so pop on over for a read, but make sure you have lots of time on your hands, this ones a gem!

xxx c

Facebook Twitter

0 guest post: MBFWA


Alessandra recently returned to Sydney after spending a year studying and working in Italy. Whilst studying for her final year of university, Alessandra explores her interests by interning at Italian fashion house Ermenegildo Zegna and freelancing for creative production companies such as The Projects* and Jack Bedwani Productions. i have known her since she was only teeny weeny and she is the most hard working girl i know - this little fashionista is going to go far...

Here is what she had to share about MBFWA 2012


Bowie first looks backstage

Working on the production side of fashion week involves many things -the most peculiar effect I noticed was that by day three most people backstage had begun to resemble stunned deers - too tired to remember to blink. Sleep deprivation and aching arches aside, those involved keep pushing on, driven by an innate love for fashion and the excitement of bringing new collections to life. It is the same passion and curiosity that leads most of us to make crazy decisions such as using rare breaks in the production schedule not to put our feet up, or get lunch, but to run and watch the next show whilst simultaneously firing off urgent emails and trying to blog.

Here is a collection of images I managed to snap amidst the madness... Enjoy.


backstage at Dylan Cooper
 

Bowie Collection
 

Bec & Bridge rehearsals
  
Alice McCall collection
  
left: Bowie, final styling             right: Bec&Bridge styling notes
 
left: Bryan Boy strikes a pose backstage right: Backstage at We Are Handsome 

 Oroton show
 
An Ode to No One Rehearsals
 
 hair and makeup backstage at Whitney Eve
 
Whitney Port giving interviews backstage
 
Ksubi finale
 
Rehearsals

pop on over to alessandra's blog and say holla

xxx c


Facebook Twitter

1 guest post: leetle AHS


Firstly, what an honour it is to be a ‘guest’ on C’s blog. I feel all fancy! Here are a few snaps of my bits and pieces. You can certainly see a similarity between our styles (now that we are officially sister-in-laws it’s probably going to continue to be this way!) Claud generously gave me the ‘For Like Ever’ poster for I think my 22nd birthday (a while ago). I just ADORE it and have included it in many vignettes over the years! The Marc Jacobs pencils are sitting in my favourite Kuhn Keramik mug {NB: purchase these at Serin Cini ploise}. The very orange Hermes bangle is sitting on the very orange John Derian plate – another one of my firm favourites. 


The newest addition to my room is the gold lamp from Fig above. Claud bought it for me as a thank you gift for helping organise her wedding. Was certainly worth the 13,000 emails and the 22,000 phone calls! You can also see my current favourite stack of books, I do tend to mix them around a bit. Anything to do with New York & Paris always turns me on. And of course my favourite Louis chair. My grandmother (mama) originally owned this beauty, and Mum had it recovered for me as a special treat not that long ago. As you already know, I do love my leopard print! 

Hope you have all enjoyed my little feature. I am new to this whole blogging thing. I can see how Claud is addicted to it though.


C & J I hope you are enjoying your honeymooooon and thinking of us all at work.

xxx Alice
Facebook Twitter

2 black and cream obsession/guest post by hannah


when claud asked me to guest on peep i wasn't sure what i would post about, claud asked me to focus on my wardrobe (i have a whole bedroom devoted to it! and a very understanding fiance for that matter) and soon realised there are a few themes, the most prevalent was black and cream folowed closely by prada and her little sister miu miu. it's funny how you don't realise your fixations until you take stock. perhaps i don't actually need that new celine phantom as much as i thought...

here is where my collection stands at right now:

prada fringe bag in black
miu miu patent black tote
alexander wang emile tote in cream
miu miu cream tote
barbara bui cream tote

cream, black, black, cream, black, cream and...wow! cream! i am really diverse in my tastes, hey? as for my wardrobe, do you think it differs from this theme? you'll have to wait until claud convinces me to do another post to find out!

xxx h
Facebook Twitter

2 my favourite chair series: part 2


Hello Peep My Style readers, it's Rachel here from Little Bits of Lovely + I'm thrilled to be guest posting for Claudia while she is off getting hitched!

When Claudia asked me to share with you my favourite chair this was rather easy,  it had to be my white louis-style chair which sits in a corner of the bedroom. I use it mainly as a place to store bags and it can often be found with clothes draped over it :) I recently bought this retro black + white cushion which goes nicely against the simplicity of the chair + I love my gold Moroccan pouffe - I actually have two and find them so handy; they easily double as an extra surface or seating.

Thank you for having me today Claudia + do stop by Little Bits of Lovely to say "hello"!

Rachel xo
Facebook Twitter

10 DIY: my favourite chair series: part 1

while i am away i will be doing a little series of 'my favourite chair' because i am oh so obsessed with them. i will begin with my own which i hope you enjoy while i am sunning myself in bali on my honeymoon!


so the saga of the DIY/project chair is finally over. remember how it started? lovely terry toweling fabric


pre sanding stage post paint stripper


sanded and ready for upholstering


choosing her new clothes, of course i went with a totally different outfit altogether!

TA DA!!!! my new favourite chair. i am so so pleased with the fabric choice, the pattern repeat fit perfectly. thanks so much Kate for your patience with me and for putting up with my single mindedness.


now for my next project...

xxx c
Facebook Twitter
Blogging tips