
 s
s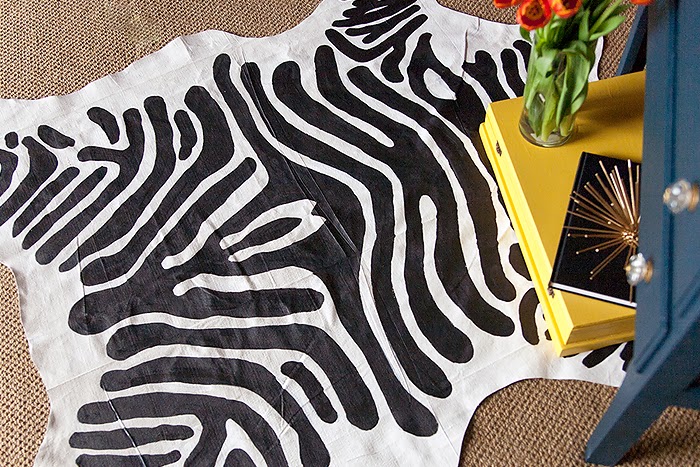
I was cruising around Instagram when I saw Lyndsay's latest DIY and I immediately emailed her asking if she would do a tutorial, I thought it was so clever! Lyndsay is a self confessed 'Treasure hunter, maker of things and designer for Frankie Jean' and here is her DIY zebra hide...
I love the look of zebra hide - something about those graphic black and white stripes always makes my heart beat a little faster. I was always prohibited by the price of buying a zebra rug (and how a real one was attained, which made me uneasy), and inspired to see brilliant DIY results on blogs like Brittany Makes and The Hunted Interior... I figured I had nothing to lose filling in a few hours one day experimenting with making my own fake one. These are the simple steps I took to making not one but two zebra rugs of my very own, using a painter’s drop cloth and paint.
You will need:

1. Roller and tray
2. A medium tin of white paint for your base coat – we used Pascol Ceiling Paint in white.
3. A small pot of your accent colour – we used a Dulux sample pot in “Klavier” (not pictured) and two pots of White Knight Strokes enamel in Gold – this was enough paint for two rugs.
4. Canvas painter’s drop cloth - choose a size that is close to the finished rug you want.
5. A print out of a zebra hide for reference
6. Pencil and eraser
7. Paintbrush
8. Scissors
A tarp, plastic or paper sheets to protect the surface you are working on (not pictured).
Step 1. Prepare your drop cloth.

Zebra hides traditionally have a white base with black stripes. The first step to your DIY rug is to cover your drop cloth with a coat of white paint.
Stretch your drop cloth out over your protective sheet or paper (leaving it flat overnight if you have time to help the creases to fall out). You may also like to tape the corners down with masking tape to keep it flat whilst you paint, but if you roll slowly and steadily you can skip this step.
Roll your white paint all over the drop cloth until it is completely covered. I recommend using a thick white paint for easy coverage– ceiling paint is great because it has a thick consistency and you should only need one decent coat. You can use a paintbrush to paint on your white paint, but a roller and tray will make this step a lot quicker/easier.
Leave to dry – I hung mine on the clothesline on a sunny day and it was dry within a few hours.
Step 2. Trim your drop cloth.

The next step is to make your rectangular drop cloth into the shape of a traditional hide. The best way to do this is to fold your drop cloth in half and draw half the outline of your hide onto the exposed drop cloth, using your reference picture as a guide (you can use this first half to trace the same shape on the other half of your hide, which would make your finished rug symmetrical). I recommend drawing your hide outline on the non-painted side of your drop cloth.
Once you are happy with your sketched shape, trim with sharp scissors and lay flat to inspect.

Don’t worry if it’s not quite the shape you want, you can always trim more to get the shape you want – however it’s a lot easier to trim more off than to put it back on, so take your time with this step! Also don’t worry if it isn’t perfectly symmetrical – most traditional hides aren’t.
Step 3. Sketch your stripes.
Now that your drop cloth is slowly turning into a rug, it’s time to add stripes.

Using your reference picture as a guide again, start sketching out where your stripes will go with a pencil on the painted side of your drop cloth. I found it easiest to fold my rug into segments and gently crease (in half, and half again), and did the same with my reference picture - and worked on one segment at a time to make sure my scaling was right. It is also easier to work from the centre outwards – the centre of my reference picture had a distinctive “W” shape which was a good place to start.
If you get confused as to whether the shape you are outlining will be white or black, you can gently shade in your black stripes from the inside out to make sure you don’t get mixed up!
Once you have finished, step back and check to see that you are happy with how it’s looking. A good rule of thumb is that zebra stripes start out quite thick, spaced out and long in the centre, and become thinner/tighter/shorter as they get closer to the edges.
Step 4. Paint your stripes.
It’s time to fill in your sketched lines with paint, which is the exciting step because your rug will start to look like a proper zebra hide!

Once again, it is a good idea to start from the centre and work outwards – you will keep your white and black stripes straight, and you will lessen the chance of smudging.
Leaving your paint exposed to air for a little while before you start painting will thicken the paint up and make it easier to apply to your canvas.

Don’t stress too much if you go over the sketched lines with your paint – if there are any major mistakes, you can wait until the accent colour dries, and then paint over it again in white to neaten things up.
You may also like to paint a border around the outer edge of your rug a la Jonathan Adler’s.
Wait for your accent colour to dry and then check it over to see if any areas need touching up – this is where a little extra paint in the bottom of your pot comes in handy. You can also paint over any exposed pencil lines. Give your rug a day or so to fully dry/cure.
Step 5. Admire your new rug!
You can use traditional black and white paint, or mix it up and use another colour instead. We used both metallic gold and a more traditional dark grey but you could use any colour you like.

If you are planning to use your rug in a high traffic area, you may like to seal it with clear polyurethane, but test this on a small patch first to make sure it doesn’t affect your colour. You can iron your rug, but leaving it lying flat for a day or so will help the majority of your creases fall out naturally (and life is too short to iron rugs, lets be honest).
Enjoy!


What an original tutorial!! I loved it and I'm definitely going to try this out! I think I have all the products on hand anyways!
ReplyDeleteThank you
This is pure genius, thanks for sharing on our Missy site too Claudia! What a superb idea !
ReplyDeleteWhat a genius idea and fun way to create design punch on a budget, nice one Claudia!
ReplyDelete